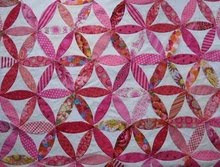
During the week, a very good friend, Gerry, visited with a big bag of fabric, needles, threads and much enthusiasm.
I had the best day teaching her how to start her first quilt!
We cut fabric, traced around templates and started stitching. I'm very impressed as she took to sewing like a pro.
First block down, many more to go. Well done Gerry.
Saturday, November 29, 2014
Tuesday, October 28, 2014
It's been a while....
Well, life has sure been interesting around here for the past few months. I didn't sew a stitch for 12 weeks, not that I was counting or anything, but it felt so bad.
I'm working hard to remedy that, so I've decided to finish a few projects that are almost done. I guess I got so close to the finish line, that I lost interest.
Today, I started by getting out 3 folders of blocks for the "Just Takes 2" red and white quilt from a few years ago. The past week has seen me finishing off 8 blocks, so now they're all done.
Onto constructing the top.
My three bulging folders of blocks.
A good start.
And here is today's section finished.
Monday, June 30, 2014
A Quilt comes home...
I've been sending my large quilts off to be machine quilted for a long time. Last year I sent several tops to KoolKat quilting in Queensland. A long way from me you might think, but Koolkat pays the postage both ways, so no problem at all.
I was extremely happy with the quilting, so when I saw a KoolKat Facebook competition with edge to edge quilting as the prize I was excited to enter.
Imagine my surprise to find I had won the competition!
I sent off my quilt 10 days ago, and received it back this morning!
The quilt is approx. 80" square. I mad this many years ago with Gingko Fantasy by Lonni Rossi.
An inspired use of a border print and some co-ordinating pieces.
The quilt has already been claimed by DH, just need to bind it.
Friday, April 11, 2014
Gathering In The Barn.
Last Saturday, I spent a lovely day stitching with very Good Friend, Gerry.
We trecked off early in the morning to Wonga Park( Visa and passport at the ready!), for a wonderful day with The Quilted Crow Ladies.
The day started with a delicious morning tea and progressed upwards from there.
Gerry and I both started stitching the lovely felted wool applique design on cotton fabric.
This is such an easy method of applique- blanket stitching around woolen shapes.
Gerry hard at work on her project. This was the first time that Gerry had attempted applique, I'm trying very hard to get her into quilting.
The shapes are all stapled down onto the background- I wasn't sure about this, but it worked really well. The staples come out very easily, and didn't "cut" through the fabric threads.
My finished piece. This class was very relaxing and enjoyable, the project so achievable. Whilst I took a few days to get finished, Gerry finished hers on the day!!!
And with the frame I purchased on the day. Now to find a place to hang it.
Tuesday, April 1, 2014
A Block Book.
The gorgeous Quilt from the Quilted Crow ladies (The Cousin's Walk) comes complete with its own block book to store all the gorgeous bird blocks in as they are completed.
I must say, this little extra was a lovely surprise as a part of the BOM.
This first month sees construction of the pieced centre block, and the Block Book. Getting my skates on to have these two finished before the next mailout of 4 blocks comes.
Gorgeous saw-tooth border around my block book. The applique for this is felted wool on an interesting linen-like fabric. A loose weave, but looks very nice.
Initially, I'd thought to do this applique by hand, however, time reality hit me , so by machine it is.
I don't think it looks too bad.
One side sewn, another pinned. Only two more to go!
Monday, March 31, 2014
A Quirky Quilt.
A couple of months ago, I was perusing The Quilted Crow girls website. Much to my enjoyment, they were offering a new BOM based on an antique quilt they'd purchased.
This quilt is quite "folk-arty", very chunky, and I found quite endearing to me. I signed up with a little trepidation- this quilt is over 100" square, but I do like large quilts. And I do love applique, so both boxes ticked.
Yesterday, I decided was time to cut into the background fabric. I've never felt such trepidation at cutting fabric in my life!
Firstly, the borders-125" along the selvage of the fabric. Gosh, that was a scary cutting exersize. Terrified I'd slip!
Thankfully, four borders cut and a tiny bit of left over.
A few hours later, and all the background is cut into various strips, squares and triangles. And a little cutting of centre fabrics too. Not nearly as stressful, though. The pieces are much smaller.
Off to piece some centre strips now and get a move along with this gorgeous quilt.
Saturday, March 8, 2014
Benjamin Biggs Block 3.
The next block for Benjamin Biggs has arrived. Amazingly, I'm keeping up with the monthly stitching for these blocks. Mind you, there isn't a lot of actual sewing so I have no excuses!
So, here's Block 2.
I printed out the pattern for Block 3, and traced it onto the back of my background fabric, very carefully reversing the corner buds. Last month I also carefully reversed the buds but somehow still got them back to front! Unfortunately I didn't realise until I'd basted them down. Grrr.
How is it possible to be so careful this month, and still get them back to front?
Looks good doesn't it? Unfortunately, this is the back, so it will be reversed when turned over the correct way.
Moving on from my spatial disasters, now off to choose fabrics. The best part.
Sunday, February 23, 2014
Benjamin Biggs Block 2.
I was going great guns on Block 2 this week. Finished the centre of the block by back basteing the large pieces, it's such a good method to keep everything stable and in place whilst stitching.
These blocks are 16" (finished), so lots of large pieces to fill the block.
Last night,I glue basted the outside corner buds ready to stitch today.
I was looking at block 1 this morning, and what did I see?
Luckily, I hadn't sewn the buds down on Block 2.
Back to the drawing board!
These blocks are 16" (finished), so lots of large pieces to fill the block.
Last night,I glue basted the outside corner buds ready to stitch today.
I was looking at block 1 this morning, and what did I see?
Luckily, I hadn't sewn the buds down on Block 2.
Back to the drawing board!
Sunday, February 9, 2014
Celtic Solstice
Well, a blogging emergency was averted this morning. I always carefully store my camera cable, I always know where it is so I can upload photos when I want to.
Somehow, I've filed it away very safely so it hasn't been seen for 4 days! I've been panic stricken. How to upload the photos?
I've never taken the SD card out of my camera before to transfer data- probably because I was oblivious to the fact that you could! Oh dear. I'm technology challenged. My DD's just look at me and shake their heads.
Anyway, I've had lessons on SD card removal and photo transfer.
So, here is my finished Celtic Solstice.
Dare I say it, it's ready to go off to the quilter!
This quilt was last year's Bonnie Hunter mystery quilt. We started the Friday after Thanksgiving, and had the last clue on New Year's Day.
Imagine how good it feels to have finished this quilt already.
I'm very happy.
I'm linking up with Bonnie Hunter's mystery quilt Link-Up. Please go and have a look at what everyone has been up to.
Thursday, January 30, 2014
Block 1 Done.
Nearly forgot to show a picture of my completed Block 1.
This block was fairly quick and easy to do, large pieces, big block.
Waiting impatiently for the next block due out on Saturday.
This block was fairly quick and easy to do, large pieces, big block.
Waiting impatiently for the next block due out on Saturday.
Thursday, January 23, 2014
Back Basteing.
I've found back basteing to be the easiest way to applique large pieces or extremely accurate pieces, as they just don't move at all whilst sewing them.
Firstly trace the pattern to the wrong side of the background fabric. If your pattern is directional, you will need to reverse it.
Cut your fabric to be appliqued 1/2" larger than the applique pattern piece.
With a larger than normal needle- an embroidery size 8 or so, and contrasting thread, running stitch around the pattern pieces to be appliqued. Notice I haven't stitched around the shapes that will be green in the centre.
Cut the fabric away just over 1/8" from the stitching line.
Applique shape down as usual. I cut the basteing thread about 1" away from where I'm appliqueing so I can needle turn the hem.
When I've finished sewing the red, I did the same with the green.
Should have used a more contrasting thread I think!
The block has leaves and buds in the corners. Because these are fairly small, straightforward shapes, I chose to trace the pattern and glue baste the fabrics. I'll just needle turn these as normal.
The centre is done, just need to stitch down the corner shapes.
Ready for the next block on 1st February.
Tuesday, January 21, 2014
Benjamin Biggs..
Have you noticed the button in the sidebar for the Benjamin Biggs Quilt? A few weeks ago, the Just Takes 2 ladies announced that they were presenting another free BOM that would run for 2 years. I must admit I was very intrigued. I really need another project. NOT! LOL.
However, I did go and have a look at the quilt. Oh my, such a gorgeous mid 18th century applique wedding quilt.
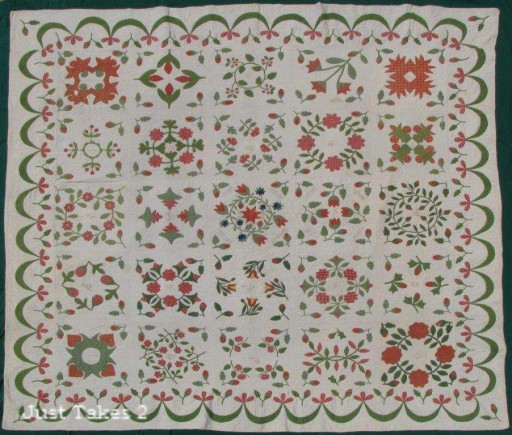
(image from Just Takes 2)
I couldn't control myself, before I knew it, background fabric was winging its way to me, and then I had to start. The quilt is mostly red and green with a splash of blue. Amazingly, I have enough of these colours in the stash to make the quilt. (actually enough to make several quilts!).
So, here's the original block from the quilt. (image from just takes 2)
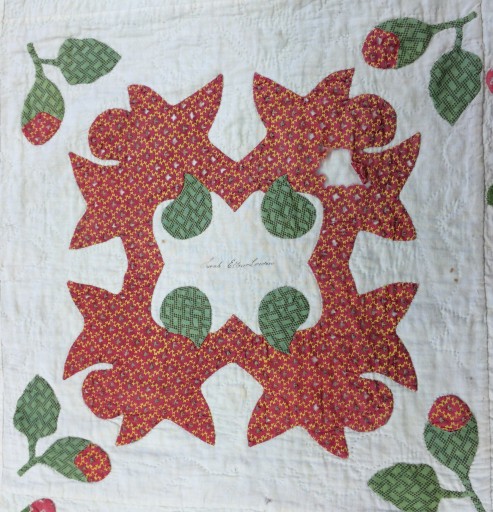
My version will be useing very similar colours of fabric
Trying to decide between these reds. At the moment, the left hand red is winning.
However, I did go and have a look at the quilt. Oh my, such a gorgeous mid 18th century applique wedding quilt.

(image from Just Takes 2)
I couldn't control myself, before I knew it, background fabric was winging its way to me, and then I had to start. The quilt is mostly red and green with a splash of blue. Amazingly, I have enough of these colours in the stash to make the quilt. (actually enough to make several quilts!).
So, here's the original block from the quilt. (image from just takes 2)

My version will be useing very similar colours of fabric
Trying to decide between these reds. At the moment, the left hand red is winning.
Sunday, January 19, 2014
Celtic Solstice.
I'm back from fabulous Summer School, so I've been spending some time on my Celtic Solstice quilt.
I had all the components sewn and ready to go when I had to leave it all for a week of sewing happiness.
So, a little more sewing...
And a lot more sewing...
And we have this. So happy with this year's mystery quilt. Of course, I'm always happy with Bonnie's designs, but she really did well this year.
There are 2 plain borders and a pieced border to go, shouldn't take too long!
Monday, January 13, 2014
Summer School.
Well, another year's Summer School has come and gone. The weather was perfect, the company wonderful and the quilts gorgeous.
"Something about Florence" is a quilt that was originally made by Florence Peto.
This is a reproduction by Susan Smith, she has used the same pink cherub fabric that was used in the original. Such a cute fabric.
As usual, my class time was filled with chatting and eating fabulous food, bt I did manage to sew these 5 paper-pieced stars.
My other class was "The Chapman Coverlet" a reproduction of a quilt that appeared in the V and A exhibition in Brisbane.
The pattern by Susan Smith was accompanied by 2 templates she had designed. The cutout on the left is fantastic for tracing the curved part on to a 2" fabric square. The easiest way to construct this small block is to applique the curved piece onto a 2 1/2" square, then stitch the squares together. Rather than trace around a shape that may move, it's very easy to trace the curve on a larger template.
This is my little pile of blocks in various stages of completion. So easy to get lots done when sitting on the couch at night.
A wonderful week away, and a couple of projects to be going on with. I love handwork!
"Something about Florence" is a quilt that was originally made by Florence Peto.
This is a reproduction by Susan Smith, she has used the same pink cherub fabric that was used in the original. Such a cute fabric.
As usual, my class time was filled with chatting and eating fabulous food, bt I did manage to sew these 5 paper-pieced stars.
My other class was "The Chapman Coverlet" a reproduction of a quilt that appeared in the V and A exhibition in Brisbane.
This is my little pile of blocks in various stages of completion. So easy to get lots done when sitting on the couch at night.
A wonderful week away, and a couple of projects to be going on with. I love handwork!
Tuesday, January 7, 2014
Busy work.
Although I'm away at a sewing week learning new skills and a couple of new patterns, I always take handwork with me to fill in stolen moments after the classes finish. I usually keep sewing on the project from class, but heaven forbid that I might want something different and be without anything to sew!
So, just for something a little different, I'm taking my applique of wool on fabric. Still working on this project from last winter, but it's a pleasure to work with the wool.
Unfortunately, it's very time consuming in its preparation. Trace shapes onto fusible, cut out, iron onto wool, cut out, press to background, and finally stitch into place. Whew!
Ready to iron into place.
I find that after fusing the shapes down, it doesn't take very long to actually blanket stitch them down, and doesn't take much concentration either! Great after a long day. Will have more blocks to show soon, nearly finished the applique blocks of this quilt.
Sunday, January 5, 2014
The Big Reveal.
It's just like Bonnie to post the last clue of Celtic Solstice a few days early and include the Big Reveal on New Year's Day.
What a great way to spend the day- sewing up a storm.
Unfortunately for me, I was headed away for the week to a Summer sewing School with friends.
So here sit my piles until I return.
Block 1 laid out. Somehow I didn't make enough four patches- they need to wait until I return

Block 2- looking good if I do say so myself.
And the blocks with part of the eventual border.
I really can't wait until I can sew this quilt together. I love the colours, and the movement around the blocks in Bonnie's finished quilt. Click the link above for a full view of her masterpiece.
What a great way to spend the day- sewing up a storm.
Unfortunately for me, I was headed away for the week to a Summer sewing School with friends.
So here sit my piles until I return.
Block 1 laid out. Somehow I didn't make enough four patches- they need to wait until I return

Block 2- looking good if I do say so myself.
And the blocks with part of the eventual border.
I really can't wait until I can sew this quilt together. I love the colours, and the movement around the blocks in Bonnie's finished quilt. Click the link above for a full view of her masterpiece.
Subscribe to:
Comments (Atom)











.jpg)


